HTML - HYPER TEXT MARKUP LANGUAGE
HTML is also known as Hyper Text Markup Language. It is a standard markup language for creating web pages.
It describes structure of web pages. It consists of series of elements. It tells the browser how to display the content.
Example of Simple HTML document :
< !DOCTYPE html >
html >
< head >
< title >Page Title
< /title >
< /head >
< body >
< h1 >My First Heading.< /h1 >
< p >My first paragraph.
< /p >
< /body >
< /html >
Explanation of Example :
The< !DOCTYPE html > declaration defines that this document is an HTML5 document.It must be specified in 1st line of web document.
The< html > element is the root element of an HTML page. This is the beginning of an HTML document.
The< head > element contains metadata(information about the document) about the HTML page.
The< title > element specifies a title for the HTML page (which is shown in the browser's title bar or
in the page's tab). It must be placed inside the head tag.
The< body > element defines the document's body, and is a container for all the visible contents,
such as headings, paragraphs, images, hyperlinks, tables, lists, etc. This tag contains main content of the HTML document.
The < h1 > element defines a large heading.
The < p > element defines a paragraph.
HTML Tags :
HTML tags are like keywords which define thathow web browser will format and display the content.
HTML tags contain three main parts:
- Opening tag
- Content and
- Closing tag
But some HTML tags are unclosed tags.
All HTML tags must enclosed within < > these brackets. Every tag in HTML perform different tasks. If you have used an open tag < tag >,
then you must use a close tag (except some tags)
Syntax :
< tag > Content < /tag >
Types of Tags :
There are two types of tags present in HTML. They are
1. Paired Tags (Container Tags) :
An HTML tag which consists of an opening tag and a closing tag is called as Paired Tags.
The first tag can be referred to as the ‘Opening Tag’, and the second tag can be called Closing Tag.
They are also called as Container Tags.
2. Unpaired Tags (Self-closing Tags / Empty Tags / Void Tags(Void Elements)) :
An HTML tag which only has an opening tag and does not have a closing tag is called as Unpaired Tag.
The Unpaired HTML tag does not require a closing tag; an opening tag is sufficient in this type.
They are also called as Self-Closing Tags, Empty Tags, Void Elements / Tags.
HTML Elements :
An HTML element is a collection of start tag, attributes, end tag, content between them.
The element usually starts with an opening tag which consists the name of the element and it indicates where the element begins.
The closing tag includes a forward slash before the element's name.
Everything inside the opening and closing tags is the content.

Basic structure of an HTML Document :
You can see the basic structure of HTML in above heading(Example of Simple HTML document).
HTML Attributes :
Elements also have attributes, whichprovides additional information about elements thatwill not appear in the content.
Attributes are always specified in the start tag.
Syntax :
< element attribute_name="attribute_value" >
Characteristics of Attributes :
There is a space between attributes and the element name
Attributes are added in the opening tag.
Elements can have many attributes.
Attributes usually have a name and a value:name=“value”
Note : But not every attribute has the same pattern.Some can exist without values, and we call them Boolean Attributes.
HTML Basic Tags & Formatting Tags :
Basic Tags :
- Heading Tags :
HTML headings are defined with the < h1 > to < h6 > tags.
- < h1 > defines the Most Important Heading.
- < h6 > defines the Least Important Heading.
- Paragraph Tags :
HTML paragraphs are defined with the < p > tag. This tag is used to create paragraphs.
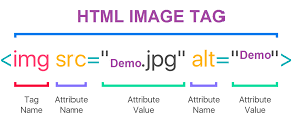
- Image Tag :
HTML images are defined with the < img > tag which is used to link the images on the webpage with the help of source file (src),
alternative text (alt) attributes.
- Formatting Tags :
HTML provides us ability to format text without using CSS. There are many formatting tags in HTML.
- < b > - It is used to bold the text written between it.
- < strong > - It tells the browser that the text is important.
- < i > - It is used to make text italic.
- < mark > - It is used to highlight the text.
- < em > - It is used to display content in italic.
- < u > - It is used to underline the text written between it.
- < del > - It is used to display the deleted content.
- < ins > - It displays the content which is added(or) inserted.
- < sup > - It is used to give Superscript.
- < sub > - It is used to give Subscript.
Anchor Tag :
The HTML anchor tag defines a hyperlink thatlinks one page to another page. It can create hyperlink to other web page as well as files,
location, or any URL. When we click on the link, it will jump to another document. When you move the mouse over a link, the mouse arrow
will turn into a little hand. The HTML < a > tag defines a hyperlink.
Syntax :
< a href="url" >link text< /a >
Appearance of Anchor Tag :
By default, links will appear as follows in all browsers:
An unvisited link is underlined and blue.
A visited link is underlined and purple.
An active link is underlined and red.
Anchor Tag Attributes :
1. href - The most important attribute of the < a > element is the href attribute, which indicates the link's destination.
The link text is the part that will be visible to the reader. Clicking on the link text, will send the reader to the specified URL address.
2. target - The target attribute specifies where to open the linked document.
By default, the linked page will be displayed in the current browser window. To change this, you must specify another target for the link.
The target attribute can have one of the following values:
- _self - Default. Opens the document in the same window/tab as it was clicked.
- _blank - Opens the document in a new window or tab.
HTML Lists :
HTML List is used to group a set of related items.
Types of lists :
- Unordered List or Bulleted List (ul)
- Ordered List or Numbered List (ol)
- Description List or Definition List (dl)
i) Unordered List or Bulleted List (ul) :
It is used to create a list of related items, in no particular order. An unordered list created using the < ul > element, and each list
item starts with the < li > element. The list items in unordered lists are marked with bullets by default. So it is also called as
Bulleted List.
Type Attribute :
We can use type attribute for < ul > tag to specify the type of bullet we need. By default, it is a disc.
Example:
< ul type = "square"> < ul type = "disc"> < ul type = "circle">
ii) Ordered List or Numbered List (ol) :
It is used to create a list of related items, in a specific order. An ordered list created using the < ol > element, and each list item
starts with the < li > element. Ordered lists are used when the order of the list's items is important. The list items in an
ordered list are marked with numbers by default. So they are also called as Numbered List.
Type Attribute :
We can use type attribute for < ol > tag to specify the type of numbering we need. By default, it is a number.
Example:
< ol type = "1"> - Default-Case Numerals.
< ol type ="I"> - Upper-Case Numerals.
< ol type = "i"> - Lower-Case Numerals.
< ol type = "A"> - Upper-Case Letters.
< ol type = "a"> - Lower-Case Letters.
Start Attribute :
We can use start attribute for < ol > tag to specify the starting point of numbering we need.
Example:
< ol type = "1" start = "4"> - Numerals starts with 4.
< ol type = "I" start = "4"> - Numerals starts with IV.
< ol type = "i" start = "4"> - Numerals starts with iv.
< ol type = "a" start = "4"> - Letters starts with d.
< ol type = "A" start = "4"> - Letters starts with D.
Description List :
A description list is a list of items with a description or definition of each item. And it is also called as a Definition List.
The
< dl > tag defines the description list, the < dt > tag defines the term (name), and the < dd > tag describes each term.
In Simple, the HTML definition list contains following
three tags:
< dl > - It defines the start of the list.
< dt > - It defines a term.
< dd > - It defines the term definition (description).
Note: Browsers usually render the definition lists by placing the terms and definitions in separate lines, where the
term's definitions are slightly indented.
HTML Table:
HTML tables allow web developers to arrange data into rows and columns. A table in HTML consists of table cells inside rows and columns.
• The HTML tables are created using the < table > tag in which the
- < table > - It defines a table.
- < th > - It defines a header in table. By default, the text in < th > elements are bold and center. th stands for table head.
- < tr > - is used to create table rows and < td > tag is used to create data cells. The elements under < td > are regular
and left aligned by default.
- < tr > - It defines a row in table. Each table row starts with a < tr > and end with a < /tr > tag. tr stands for table row.
- < td > - It defines a cell in table. Everything between < td > and < /td > are the content of the table cell. td stands for
table data.
Table Attributes :
border - This attribute is used to put a border across all the cells. If border is not required, we can use border = "0" and
it is deprecated.
cellspacing - It defines space between table cells.
cellpadding – It defines the distance between cell borders and the content within a cell.
colspan - It is used to merge two or more columns into a single column.
rowspan - It is used to to merge two or more rows.
More Tags in Table :
< caption > - The caption tag will serve as a title or explanation for the table and it shows up at the top of the table.
< tfoot > - It is used to create a separate table footer.
< thead > - It is used to group the header content in a table.
< tbody > - It is used to group the body content in a table.
Attributes in Table for Applying :
Background and Foreground fills :
background – It is used to set background image for whole table or just for one cell.
bgcolor – It is used to set background color for whole table or just for one cell.
bordercolor – It is used to set border color for the table.
Note: The border, bgcolor, background, and bordercolor attributes are deprecated in HTML5. Do not use these attributes.
HTML Form :
An HTML form is used to collect user input. The user input is most often sent to a server for processing.
An HTML form is a section of a document which contains controls such as text fields, password fields, checkboxes, radio buttons,
submit button, menus etc.
Syntax :
< form action = "Script URL" method = "GET|POST" > form elements like input, textarea etc. < /form >
HTML Form Elements :
The HTML < form > elements provide a document section to take input from user. It provides various interactive controls for submitting
information to web server such as text field, text area, password field, etc.
Note: The < form > element doesn’t create a form itself but it is a container to contain all required form elements such as
< input >, < label >, < textarea >, etc.
< input > - This is a fundamental form element. It is used to create form fields, to take input from user. The < input > element can
be displayed in several ways, depending on the type attribute.
< textarea > - This element defines a multi-line input field (a text area). The size of < textarea > can be specified either
using "rows" or "cols" attribute or by CSS.
< button > - The < button > element defines a clickable button. We can also create a clickable button using < input >tag by setting
its type attribute to button.
< select > - The < select > element defines a drop-down list. A select box which is also called as drop down box provides option to
list down various options in the form of drop down list, from where a user can select one or more options.
- The < option > element defines an option that can be selected.
- By default, the first item in the drop-down list is selected.
- To define a pre-selected option, add the selected attribute to the option.
< datalist > - The < datalist > element specifies a list of pre-defined options for an < input > element. Users will see a
drop-down list of the pre-defined options as they input data. The list attribute of the < input > element, must refer to the id
attribute of the < datalist > element.
< label > - This tag is used to specify a label for an < input > element of a form. The < label > element is useful for
screenreader users, because the screen-reader will read out loud the label when the user focuses on the input element.
The ‘for’ attribute of the < label > tag should be equal to
the ‘id’ attribute of the < input > element to bind them together.
Difference of < select > tag and < datalist > tag :
              < select > tag                                           < datalist > tag
  The user can choose only one option from the given    The user can choose any option from the given list but
  list.                                                 can also use its own input.
  This tag is a form input type.                        This tag is not a form input type.
  The user has to scan a long list so as to select an   The user can easily input the option and get the hints and
  option.                                               then can be chosen by the user.

  The user can be restricted to a list of options.      The user is not restricted by the list of options.
  It doesn’t provide the auto-complete feature.         It provides the auto-complete feature
HTML Input Types :
In HTML < input type=" " > is an important element of HTML form. The "type" attribute of input element can be various types,
which defines information field.
Note: The default value of the type attribute is "text".
text - Defines a single-line text input field
password - Defines a single-line password input field
submit - Defines a submit button to submit the form to server
reset - Defines a reset button to reset all values in the form.
radio - Defines a radio button which allows select one option.
checkbox - Defines checkboxes which allow select multiple options form.
button - Defines a simple push button, which can be programmed to perform a task on an event.
file - Defines to select the file from device storage.
date - Defines an input field for selection of date.
email - Defines an input field for entering an email address.
number - Defines an input field to enter a number.
tel - Defines an input field for entering the telephone number.
HTML Input Attributes :
value - The value attribute specifies an initial value
for an input field.
size - The size attribute specifies the visible width, in characters, of an input field. The default value for size is 20.
Note: The size attribute works with the following
Input types: text, search, tel, url, email, and password.
multiple - Specifies that a user can enter multiple values. The multiple attribute works with the following input types:
email, and file.
maxlength and minlength - The maxlength and minlength attribute specifies the maximum and minimum number of characters allowed
in an input field.
min and max – The input min and max attributes specify the minimum and maximum numerical values for an input field.
checked - If type = "radio" or type = "checkbox" it will already be selected when the page loads, if checked attribute is given.
required - The input required attribute specifies that an input field must be filled out before submitting the form.
pattern - The input pattern attribute specifies a regular expression that the input field's value is checked against, when the
form is submitted.
readonly – It specifies that an input field is read-only.It won't allow the user to change the value. The control however, can
receive focus and are included when tabbing through the form controls. The value of a read-only input field will be sent when submitting
the form.
placeholder - Specifies a short hint that describes the expected value. (a sample value or a short description of the
expected format).
Note: The short hint is displayed in the input field before the user enters a value.
autofocus - The input autofocus attribute specifies that an input field should automatically get focus when the page loads.
autocomplete - The input autocomplete attribute specifies whether a form or an input field should have autocomplete on or off.
novalidate – It defines that form elements should not be validated when submitted.
Form Validation :
The pattern attribute specifies a regular expression
that the < input > element's value is checked against on
form submission.
Note: The pattern attribute works with the following input types: text, date, search, url, tel, email, and password.
Tip: Use the global title attribute to describe the pattern to help the user.
An < input > element with type="password" that must
contain 8 or more characters:
Example: pattern=".{8,}"
An < input > element with type="password" that must
contain 8 or more characters that are of at least one
number, and one uppercase and lowercase letter:
Example: pattern="(?=.*\d)(?=.*[a-z])(?=.*[A-Z]).{8,}"
HTML Media :
Multimedia elements (like audio or video) are storedin media files.
The most common way to discover the type of a file is to look at the file extension.
Note: Only MP4, WebM and Ogg video are supported by the HTML standard.
HTML Video :
The HTML < video > element is used to show a video on a web page.

Video Attributes :
controls - The controls attribute adds video controls, like play, pause, and volume.
autoplay – It is used To start a video automatically.
muted – It is used to mute the video.
Note: Chromium browsers do not allow autoplay in most cases. However, muted autoplay is always allowed.
loop – It is used to play the video in loop.
Audio :
The HTML < audio > element is used to play an audio file on a web page.

Audio Attributes :
controls - The controls attribute adds audio controls,
like play, pause, and volume.
autoplay – It is used To start an audio automatically.
muted – It is used to mute the audio.
Note: Chromium browsers do not allow autoplay in
most cases. However, muted autoplay is always
allowed.
loop – It is used to play the audio in loop.
Grouping Elements :
Grouping our HTML content in containers makes it easier for us to target our elements with class and id selectors and makes it easier
for us to position and style HTML via CSS.
These elements don’t add or change the content of our HTML. Instead, its main purpose is to provide an easy way to target and each group.
There are a number of additional tags that allow us to group related HTML content together. Some examples include
< div > < span > < header > < section > < article > and < footer >.
« Previous
Next Topic »
(CSS - Cascading Style Sheet)
|